vue3学习笔记
vue3 学习笔记
1.bem 架构
bem 架构即Block(块层),element(元素层),modifier(修饰符层),是由 Yandex 团队提出的一种 css 命名方法.
.block-name__element-name--modifier-name--modifier-value {}
遵循以下原则:
- 使用
__两个下划线将块元素与名称分开 - 使用
--两个破折号分隔元素名称及修饰符 - 一切样式都是一个类,不能嵌套
以 elementUI 中的组件为例:
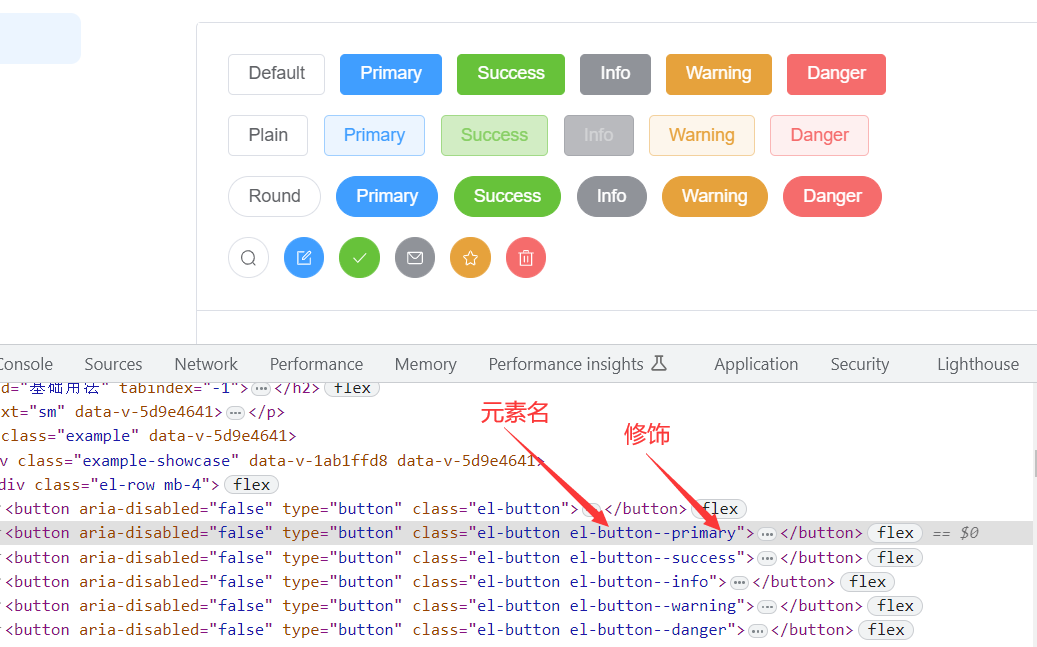
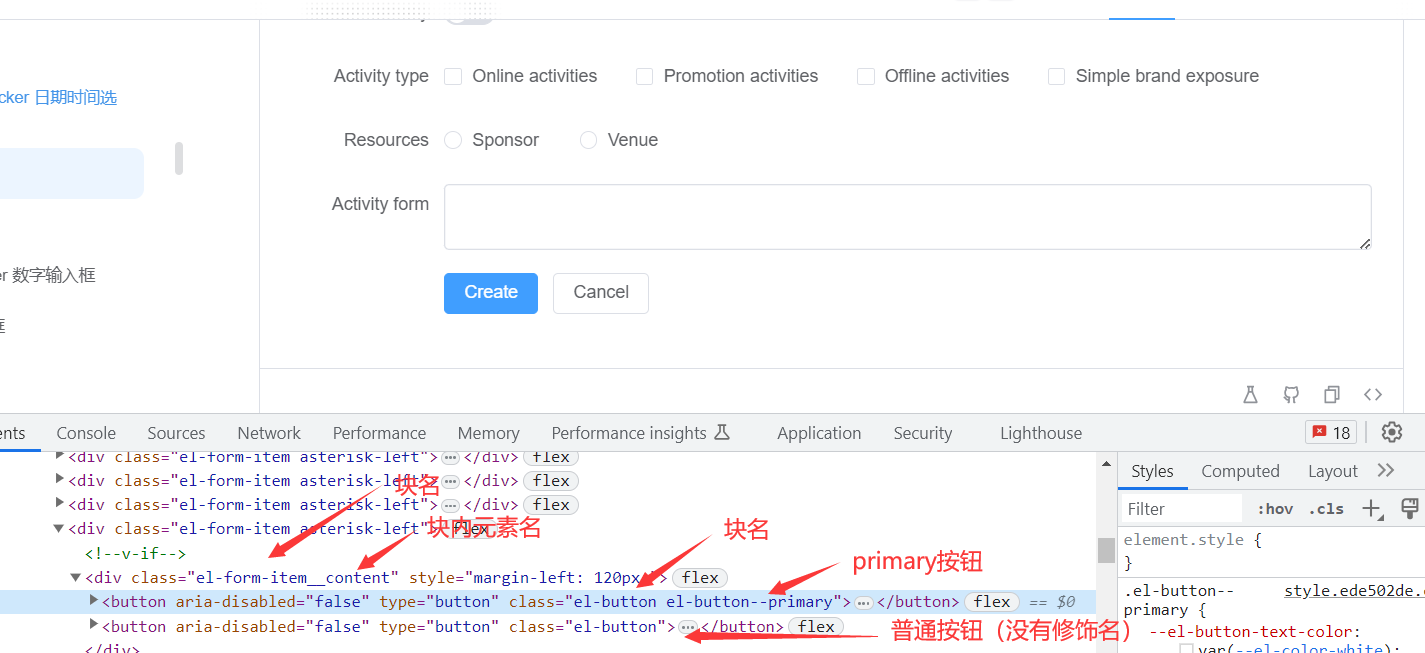
1.1 使用 Sass 编写 bem 架构
1.安装 sass
pnpm install sass
2.创建 bem.scss 文件
$namespace: 'zay' !default;
$block-sel: '-' !default;
$elem-sel: '__' !default;
$mod-sel: '--' !default;

@mixin b($block) {
  $B: #{$namespace + $block-sel + $block};
  .#{$B} {
    @content;
  }
}

@mixin e($el) {
  $select: &;
  @at-root {
    #{$selector + $elem-sel + $el} {
      @content;
    }
  }
}

@mixin m($mod) {
  $selector: &;
  @at-root {
    #{$selector + $mod-sel + $mod} {
      @content;
    }
  }
}
3.配置全局使用 在 vite.config.js 中
css: {
  preprocessorOptions: {
    scss: {
      additionalData: `@imoprt "./src/bem.scss"`
    }
  }
}
4.使用
<template>
  <div class="zay-block">你好</div>
  <div class="zay-botton zay-botton--primary">
    <div class="zay-botton__content">按钮</div>
  </div>
</template>

<style lang="scss">
@include b(block) {
  color: red;
}

@include b(botton) {
  font-size: 14px;
  width: 40px;
  @include m(primary) {
    background-color: blue;
  }

  @include e(content) {
    color: red;
  }
}
</style>
5.效果
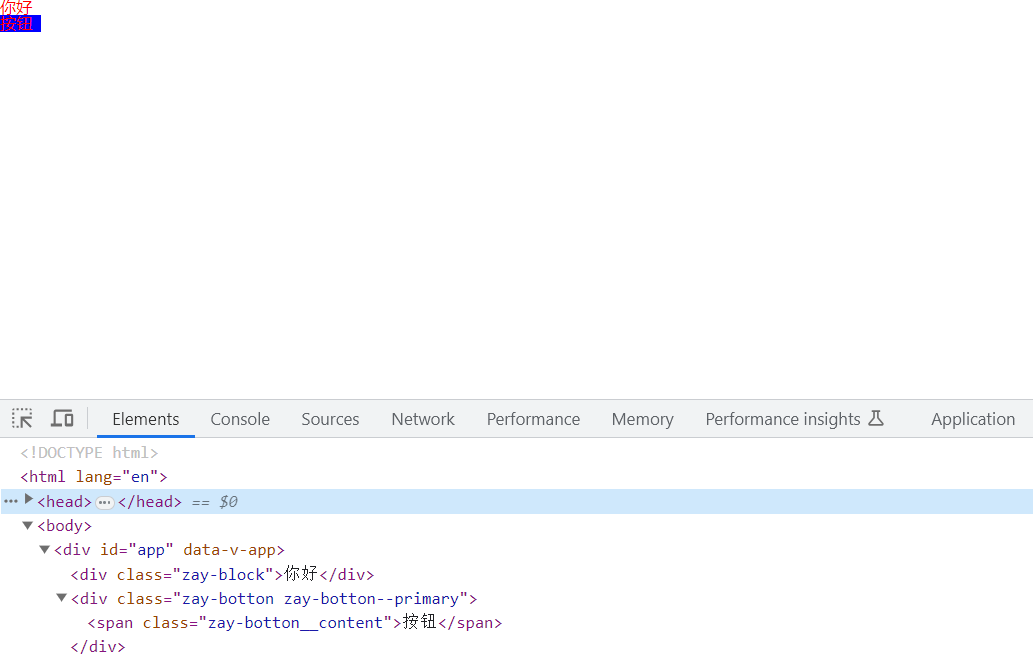
2.父子组件传参
2.1 父传子
可以通过父组件上通过v-bind传递值,子组件通过defineProps来接收值
父组件传递值
<father :title="name" :selectArr="[112, 32, 43]"></father>
子组件接收值
- 以对象的方式:
<script setup>
const prop = defineProps({
  title: {
    type: String,
    default: '默认值',
  },
  selectArr: {
    type: Array,
    default: [],
  },
})
</script>
- 以 ts 类型的方式:
<script setup lang="ts">
const props = defineProps<{ title: String; selectArr: Number[] }>()
</script>
如果我们想在以 ts 类型的方式也让属性有默认值的话,需要使用withDefaults()
<script setup lang="ts">
interface Props {
  title: string
  selectArr: number[]
}
withDefaults(defaineProps<Props>(), {
  title: 'aaa',
  selectArr: () => [],
})
</script>
2.2 子传父
父组件通过绑定事件来接收, 子组件通过defineEmits来传递值
父组件接收值
<father @on-click="getName"></father>
<script>
const getName = (name: string) => {
  console.log(name + '------ 我是子组件传递过来的值')
}
</script>
子组件传递值
<button @click="setName">提交</button>
<script lang="ts" setup>
const emits = defineEmits(['on-click'])
const setName = () => {
  emits('on-click', 'aaa')
}
</script>
- ts 的方式
<script>
const emits = defineEmits<{
    (e:'on-click', name:string):void
}>()
// 3.3+ 版本中可以使用跟简洁的方式
const emits = defineEmits<{
    'on-click': [name: string]
}>()
</script>
向父组件暴露属性
子组件通过defineExpose暴露属性
<script lang="ts" setup>
defineExpose({
  name: 'aaaa',
})
</script>
父组件组件调用
<child :ref="waterFall"></child>
<script lang="ts" setup>
const waterFall = ref<InstanceType<typeof child>>()
console.log(waterFall.value?.name) // undefined

// 初始的时候ref 还没有挂载,需要到onMounted 中才能看到值
onMounted(() => {
  console.log(waterFall.value?.name) // aaaa
})
</script>
2.3 双向绑定
在 vue3 中如果想实现父子组件双向绑定,除了可以使用v-bind, 和emit()的方式来实现还可以通过一个简写方式:
父组件 father.vue
<Child v-model:bothway="bothway"></Child>
<script>
import { ref } from 'vue'
const bothway = ref < string > '我是默认值'
</script>
子组件 Child.vue
<template>
  父组件传给子组件的值:{{ bothway }}
  <button @click="sendBothway">修改双向绑定的值</button>
</template>

<script>
const props = defineProps(['bothway'])
// 数组字面量的方式
const emit = defineEmits(['update:bothway'])

/**
 	ts的方式
 	const emit = defineEmits<{
 	(e: 'update:bothway', value: string):void
 	}>()

 	ts方式简写
 	const emit = defineEmits<{
 		'update:bothway': [value: string]
 	}>()
    **/

const sendBothway = () => {
  emit('update:bothway', '修改了双向绑定了')
}
</script>
2.3 瀑布流实现
父组件 WaterFall.vue
<template>
  <div class="water-fall">
    <WaterFallChild :list="list"></WaterFallChild>
  </div>
</template>

<script setup lang="ts">
import { ref } from 'vue'
import WaterFallChild from './WaterFallChild.vue'

const list = ref<{ height: number; background: string }[]>([])
// 模拟瀑布流图片数据
const colorList = ['red', 'blueviolet', 'black', 'aquamarine', 'brown', 'chartreuse']
const randomNum = 50
for (let i = 0; i < randomNum; i++) {
  const colorIndex = Math.floor(Math.random() * colorList.length)
  const heightNum = Math.ceil(Math.random() * 5) * 100
  list.value.push({ height: heightNum, background: colorList[colorIndex] })
}
</script>

<style scoped lang="scss"></style>
瀑布流组件 WaterFallChild.vue
<template>
  <div class="zay-wrap">
    <div
      v-for="item in waterList"
      :style="{
        height: item.height + 'px',
        backgroundColor: item.background,
        left: item.left + 'px',
        top: item.top + 'px',
      }"
      class="zay-wrap__item"
    ></div>
  </div>
</template>

<script setup lang="ts">
import { onMounted, toRefs, reactive } from 'vue'

const props = defineProps<{ list: any[] }>()
const waterList = reactive<any[]>([])
const heightList: number[] = []

// 构建瀑布流
const init = () => {
  const width = 130
  const x = document.body.clientWidth
  const column = Math.floor(x / width)

  const { list } = toRefs(props)
  for (let i = 0; i < list.value.length; i++) {
    // 先摆放好第一排,构建第一排的高度数组,之后根据这高度数组来往最低的位置放放置新的div
    if (i < column) {
      list.value[i].left = i * width
      list.value[i].top = 20
      waterList.push(list.value[i])
      heightList.push(list.value[i].height + 20)
    } else {
      // 找出最小高度的列,往该位置添加div, 并更新该列的高度
      let current = heightList[0]
      let index = 0
      heightList.forEach((h, i) => {
        if (current > h) {
          current = h
          index = i
        }
      })
      list.value[i].left = index * width
      list.value[i].top = current + 20
      heightList[index] = heightList[index] + list.value[i].height + 20
      waterList.push(list.value[i])
    }
  }
}

onMounted(() => {
  init()
})
</script>

<style scoped lang="scss">
@include b(wrap) {
  position: relative;
  @include e(item) {
    position: absolute;
    width: 120px;
  }
}
</style>
效果如下:
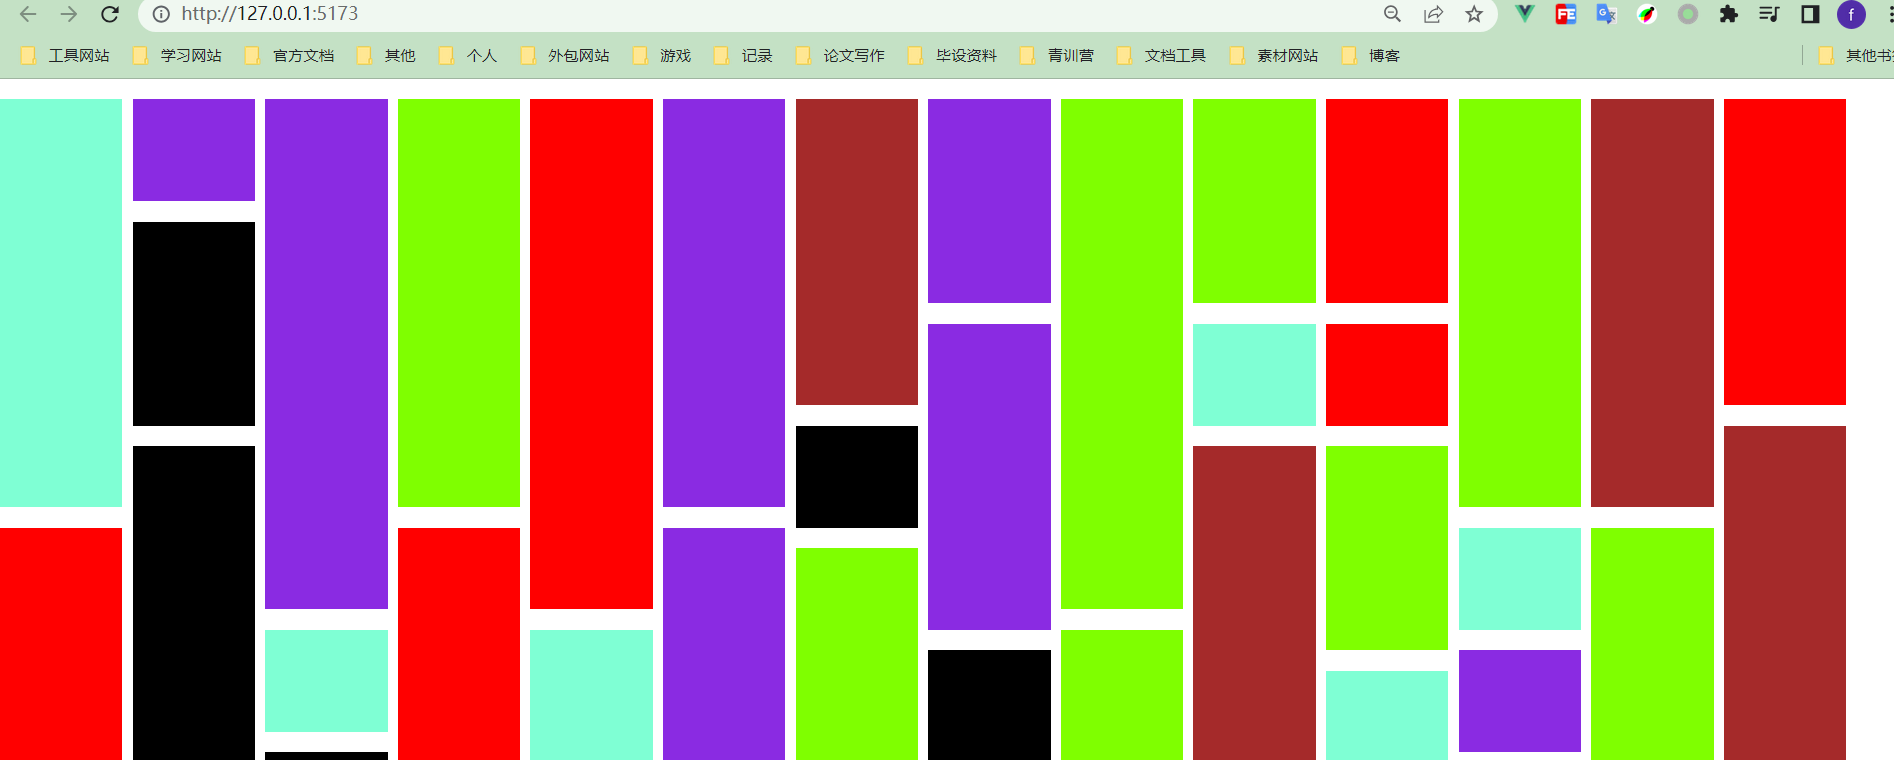
3.组件
3.1 局部组件
局部组件就是通过import xxx from './components/xxx.vue'导入进来的组件,只能在该组件中生效
使用局部组件
<template>
  <ComTest></ComTest>
</template>
<script>
import ComTest from './components/ComTest.vue'
</script>
3.2 全局组件
注册全局组件需要到main.ts中通过app.component()来注册
import xxx from './components/xxx.vue'
app.component('OverAll', xxx)
3.3 递归组件
递归组件就是自己调用自己的组件,常用做树型列表等场景,
实现一个递归组件:Tree.vue
<template>
  <div class="tree" v-for="(item, key) in treeData" :key="key">
    <input type="checkbox" name="" id="" :checked="item.checked" /> <span>{{ item.name }}</span>
    <Tree v-if="item?.children?.length" :treeData="item.children"></Tree>
  </div>
</template>

<script setup lang="ts">
import { toRefs } from 'vue'
const props = defineProps(['treeData'])
const { treeData } = toRefs(props)
</script>

<style scoped>
.tree {
  margin-left: 25px;
}
</style>
使用:App.vue
<template>
  <div class="content">
    <Tree :treeData="treeData"></Tree>
  </div>
</template>

<script setup lang="ts">
import Tree from './components/Tree.vue'
import { reactive } from 'vue'

interface TreeType {
  name: string
  checked: boolean
  children?: TreeType[]
}

// 模拟树状数组数据
const treeData = reactive<TreeType[]>([
  {
    name: '树1',
    checked: false,
    children: [{ name: '树1-1', checked: false }],
  },
  {
    name: '树2',
    checked: false,
    children: [
      {
        name: '树2-1',
        checked: false,
        children: [
          {
            name: '树2-1-1',
            checked: false,
          },
          {
            name: '树2-1-2',
            checked: false,
          },
        ],
      },
      {
        name: '树2-2',
        checked: false,
      },
    ],
  },
  {
    name: '树3',
    checked: false,
    children: [{ name: '树3-1', checked: false }],
  },
])
</script>

<style scoped>
.content {
  width: 500px;
  margin: 12px auto;
  border: 1px solid black;
}
</style>
效果:

3.4 修改组件名
在如上案例中,如果们想改组件的名字,就只能改组件文件名,也可以使用再建一个<script>的方式
Tree.vue
<template>
  <div class="tree" v-for="(item, key) in treeData" :key="key">
    <input type="checkbox" name="" id="" :checked="item.checked" /> <span>{{ item.name }}</span>
    <!--这里可以直接使用Test组件名-->
    <Test v-if="item?.children?.length" :treeData="item.children"></Test>
  </div>
</template>

<script setup lang="ts">
import { toRefs } from 'vue'
const props = defineProps(['treeData'])
const { treeData } = toRefs(props)
</script>

<script>
// 文件内修改组件名称
export default {
  name: 'Test',
}
</script>

<style scoped>
.tree {
  margin-left: 25px;
}
</style>
也可使用插件:unplugin-vue-define-options
插件在<setup>中添加了一个函数defineOptions()
<script>
// 直接修改组件名
defineOptions({
  name: 'Foo',
  inheritAttrs: false,
})
</script>
在 vue3.3+版本中已经支持了该种写法,不需要导入组件文档说明
我自己也尝试了一种想法,也能实现修改名字的效果,就是通过import xxx from 'Tree.vue'也能实现修改组件名的效果, 不建议参考哈,自己的一点小尝试😂😂😂😂
<template>
  <div class="tree" v-for="(item, key) in treeData" :key="key">
    <input type="checkbox" name="" id="" :checked="item.checked" /> <span>{{ item.name }}</span>
    <!--也能达到修改组件名的效果-->
    <Test v-if="item?.children?.length" :treeData="item.children"></Test>
  </div>
</template>
<script>
import Test from './Tree.vue'
</script>
3.5 动态组件
我们可以通过<component :is="">来动态绑定组件
DynamicState.vue
<template>
  <div>
    <div class="zay-botton-list">
      <div v-for="(item, key) in data" :key="key" class="zay-botton" :class="{ 'zay-botton--active': key === active }" @click="switchTable(item, key)">
        {{ item.name }}
      </div>
    </div>
    <Component :is="comId"></Component>
  </div>
</template>

<script setup lang="ts">
import Avue from './A.vue'
import Bvue from './B.vue'
import Cvue from './C.vue'

import { ref, shallowRef, shallowReactive, type Component } from 'vue'
interface dataType {
  name: string
  com: Component
}

// 这里我们需要使用shallowRef 来代理,使其只监听浅层
const comId = shallowRef<Component>(Avue)
const active = ref(0)

const data = shallowReactive<dataType[]>([
  {
    name: 'A组件',
    com: Avue,
  },
  {
    name: 'B组件',
    com: Bvue,
  },
  {
    name: 'C组件',
    com: Cvue,
  },
])

const switchTable = (item: dataType, index: number) => {
  comId.value = item.com
  active.value = index
}
</script>

<style scoped lang="scss">
@include b(botton-list) {
  display: flex;
  margin-top: 20px;
}

@include b(botton) {
  padding: 8px 10px;
  border: 1px solid black;
  margin-right: 10px;
  @include m(active) {
    background-color: aqua;
  }
}
</style>
效果:

还可以采用选项式 API的方式:
<script>
import Avue from './A.vue'
import Bvue from './B.vue'
import Cvue from './C.vue'

export default {
  conponents: {
    Avue,
    Bvue,
    Cvue,
  },
}
</script>
使用这种方式,就不需要浅层代理,可以里面直接输入字符串
const data = Reactive([
  {
    name: 'A组件',
    com: 'Avue',
  },
  {
    name: 'B组件',
    com: 'Bvue',
  },
  {
    name: 'C组件',
    com: 'Cvue',
  },
])
3.6 异步组件
异步组件,就是将组件单独打包,当需要访问的时候才加载该组件的 js(默认情况下,当把 vue 项目打包时会生成一个 js, 当项目过大的时候,一个 js 可能 10 多 M,在网速慢的情况下,会造成首屏加载时间过长,造成用户体验差,这时我们可以使用异步组件 PS:个人理解,有错误欢迎指正)
使用异步组件实现一个骨架屏效果
加载时显示组件:Skeleton.vue
<template>
  <div class="zay-skeleton">
    <div class="zay-skeleton__header">
      <div class="zay-skeleton__icon zay-skeleton--bg"></div>
      <div class="zay-skeleton__name zay-skeleton--bg"></div>
    </div>
    <div class="zay-skeleton__content">
      <div class="zay-skeleton__content-item zay-skeleton--bg"></div>
      <div class="zay-skeleton__content-item zay-skeleton--bg"></div>
      <div class="zay-skeleton__content-item zay-skeleton--bg"></div>
    </div>
  </div>
</template>

<script setup lang="ts"></script>

<style scoped lang="scss">
@include b(skeleton) {
  width: 500px;
  height: 250px;
  border: 1px solid black;
  padding: 8px 12px;
  @include e(header) {
    display: flex;
    align-items: center;
    padding: 12px 0px;
    border-bottom: 1px solid black;
  }
  @include e(icon) {
    width: 50px;
    height: 50px;
    border-radius: 50%;
  }
  @include e(name) {
    margin-left: 12px;
    width: 125px;
    height: 18px;
  }

  @include e(content) {
    padding: 12px 0px;
  }
  @include e(content-item) {
    height: 18px;
    margin-bottom: 8px;
  }

  @include m(bg) {
    background-color: rgb(204, 204, 204);
  }
}
</style>
异步组件:Sync.vue
<template>
  <div class="zay-skeleton">
    <div class="zay-skeleton__header">
      <img class="zay-skeleton__icon" :src="data.url" />
      <div class="zay-skeleton__name">{{ data.name }}</div>
    </div>
    <div class="zay-skeleton__content">{{ data.desc }}</div>
  </div>
</template>

<script setup lang="ts">
import { axios } from '@/server/axios'
interface dataType {
  data: {
    name: string
    age: number
    url: string
    desc: string
  }
}
// 顶层await 即为异步组件
const { data } = await axios.get<dataType>('./data.json')
</script>

<style scoped lang="scss">
@include b(skeleton) {
  width: 500px;
  height: 250px;
  border: 1px solid black;
  padding: 8px 12px;
  @include e(header) {
    display: flex;
    align-items: center;
    padding: 12px 0px;
    border-bottom: 1px solid black;
  }
  @include e(icon) {
    width: 50px;
    height: 50px;
    border-radius: 50%;
  }
  @include e(name) {
    margin-left: 12px;
    width: 125px;
    height: 18px;
  }

  @include e(content) {
    padding: 12px 0px;
  }
}
</style>
自己封装的 axios.ts
export const axios = {
  get<T>(url: string): Promise<T> {
    return new Promise((reslove) => {
      const xhr = new XMLHttpRequest()
      xhr.open('GET', url)

      xhr.onreadystatechange = () => {
        if (xhr.readyState === 4 && xhr.status === 200) {
          resolve(JSON.parse(xhr.responseText))
        }
      }
      xhr.send(null)
    })
  },
}
使用:
<template>
  <Suspense>
    <!--异步组件-->
    <template #default>
      <Sync></Sync>
    </template>
    <!--加载时显示的组件-->
    <template #fallback>
      <Skeleton></Skeleton>
    </template>
  </Suspense>
</template>

<script setup lang="ts">
import Skeleton from './components/expame/Skeleton.vue'
import { reactive, defineAsyncComponent } from 'vue'

interface TreeType {
  name: string
  checked: boolean
  children?: TreeType[]
}
const Sync = defineAsyncComponent(() => import('@/components/expame/Sync.vue'))
</script>

<style scoped lang="scss"></style>
效果:

3.7 传送组件
传送组件,就是将该组件传送到指定的标签内,这时该组件将成为指定标签的子组件,可以用在移动端吸顶,pc 端内嵌这种场景下
<template>
  <!--可以通过disabled 来控制是否启用传送组件-->
  <Teleport :disabled="isMoblie" to="body">
    <div>传送了</div>
  </Teleport>
</template>
<script>
import { ref } from 'vue'
const isMoblie = ref(true)
</script>
3.8 缓存组件
当我们不需要组件重新渲染的时候,或者出于性能考虑,避免多次重复渲染降低性能,可以使用<keep-alive> 缓存组件.
用法:
<template>
  <!--
		exculde 指定不缓存页面
		max 指定缓存的数量
		inlcude 指定缓存的页面A, B
		页面被缓存时,默认输入的参数也会被保存, 如from 表单中的input 等
	-->

  <keep-alive :include="[A, B]">
    <A v-if="flag"></A>
    <B else></B>
  </keep-alive>
</template>
使用缓存组件时,会新增两个生命周期分别是onActivated() 和 onDeactivated()
<script>
onActivate(() => {
  console.log('选中时')
})
onDeactivated(() => {
  console.log('keep-alive 卸载时')
})
</script>
3.9 动画组件
vue 提供了 transtion(动画)的封装组件,在一下情况下可给任何元素和组件添加进入/离开的过渡动画:
- 条件渲染(v-if)
- 条件展示(v-show)
- 动态组件
- 组件根节点
使用:
<template>
  <div>
    <button @click="flag = !flag">切换</button>
    <Transition name="fade">
      <div v-if="flag" class="box"></div>
    </Transition>
  </div>
</template>

<script setup lang="ts">
import { ref } from 'vue'
const flag = ref<boolean>(true)
</script>

<style scoped>
.box {
  width: 200px;
  height: 200px;
  background: red;
}
/**总共六个class, 通过Transtion 组件上的name 属性来定义class 表示, 如果没有name = 默认是 v-开头**/
/**进入开始时**/
.fade-enter-from {
  width: 0;
  height: 0;
}
/**进入进行中**/
.fade-enter-active {
  transition: all 1.5s ease;
}
/**进入结束后**/
.fade-enter-to {
  width: 200px;
  height: 200px;
}
/**退出开始时**/
.fade-leave-from {
  width: 200px;
  height: 200px;
}
/**退出进行中**/
.fade-leave-active {
  transition: all 1.5s ease;
}
/**退出结束后**/
.fade-leave-to {
  width: 0;
  height: 0;
}
</style>
第二种方式: 还可直接给transtion上添加属性的方式来指定 css
// 设置进入前动画
<Transtion enter-from-class="enter-from"></Transtion>

<style>
.enter-from {
  width: 200px;
  height: 200px;
}
</style>
使用该种方式可以和动画库结合使用
使用自定义 class 结合 animate.css
安装 animate.css
pnpm install animate.css
在 main.ts 中导入
import 'animate.css'
使用:
// 结合animate.css 进入进行中
<Transition enter-active-class="animate__animated animate__bounce">
   <div v-if="flag" class="box"></div>
</Transition>
transition 的生命周期
@before-enter="beforeEnter" // 对应enter-from @enter="enter" // 对应enter-active @after-enter="afterEnter" // 对应enter-to @enter-cancelled="enterCancelled" // 显示过渡打断 @before-leave="beforeLeave" // 对应leave-from @leave="leave" //
对应leave-active @after-leave="afterLeave" // 对应leave-to @leave-cancelled="leaveCancelled" // 离开过渡打断
GreenSock js 动画库的使用
<template>
  <div>
    <button @click="flag = !flag">切换</button>
    <!-- <Transition enter-active-class="animate__animated animate__bounce">
      <div v-if="flag" class="box"></div>
    </Transition> -->
    <Transition @before-enter="EnterFrom" @enter="EnterActive" @after-enter="EnterTo" @enter-cancelled="EnterCancel" @leave="Leave">
      <div v-if="flag" class="box"></div>
    </Transition>
  </div>
</template>

<script setup lang="ts">
import gsap from 'gsap'
import { ref } from 'vue'
const flag = ref<boolean>(true)

const EnterFrom = (el: Element) => {
  gsap.set(el, {
    width: 0,
    height: 0,
  })
}
const EnterActive = (el: Element, done: gsap.Callback) => {
  gsap.to(el, {
    width: 200,
    height: 200,
    onComplete: done,
  })
}
const Leave = (el: Element, done: gsap.Callback) => {
  gsap.to(el, {
    width: 0,
    height: 0,
    onComplete: done,
  })
}
</script>

<style scoped>
.box {
  width: 200px;
  height: 200px;
  background: red;
}
</style>
还可以通过appear 设置初始节点过渡,就是页面加载完成就开始动画对应三个状态
<transition appear appear-from-class="from" appear-active-class="active" appear-to-class="to">

</transition>

<style>
.from {
  width: 0px;
  height: 0px;
}
.active {
  transition: all 2s ease;
}
.to {
  width: 200px;
  height: 200px;
}
</style>
3.10 过渡列表
过渡列表组件TransitionGroup不同于Transition组件内只能有一个元素,TransitionGroup内可以有多个元素,除这点不同以外,其他的用法和Transition组件一样。
使用 TransitionGroup+animate
<template>
  <div>
    <button @click="pushHandle">push</button>
    <button @click="popHandle">pop</button>
    <div class="list-style">
      <transition-group enter-active-class="animate__animated animate__rotateInUpLeft" leave-active-class="animate__animated animate__rotateOutDownLeft">
        <div v-for="(item, key) in list" :key="key" class="item-style">{{ item }}</div>
      </transition-group>
    </div>
  </div>
</template>

<script setup lang="ts">
import { reactive } from 'vue'
const list = reactive([1, 2, 3, 4, 5])

const pushHandle = () => {
  list.push(list.length + 1)
}
const popHandle = () => {
  list.pop()
}
</script>

<style scoped>
.list-style {
  display: flex;
  margin-top: 12px;
}

.item-style {
  width: 20px;
  height: 20px;
  text-align: center;
  line-height: 20px;
  border: 1px solid black;
  cursor: pointer;
}
</style>
踩坑:一定要绑定 key 不然 push 的时候没有动画😅😅
参考 vue 官网说明:https://cn.vuejs.org/guide/built-ins/transition-group.html#differences-from-transition
效果:

平面过渡
实现随机列表的效果
<template>
  <div>
    <button @click="random">random</button>
    <transition-group tag="div" class="wraps" move-class="mmm">
      <!--一定要绑定自己的key, 能用for(item,key) in list 这个key, 因为他每次都是重新开始的,并像自己设定的,绑定具体对象-->
      <div v-for="(item, key) in list" :key="item.id" class="item-box">{{ item.number }}</div>
    </transition-group>
  </div>
</template>

<script setup lang="ts">
import { ref } from 'vue'
import _ from 'lodash'
const list = ref(
  Array.apply(null, { length: 81 } as number[]).map((_, index) => {
    return {
      id: index,
      number: (index % 9) + 1,
    }
  })
)

const random = () => {
  list.value = _.shuffle(list.value)
}
</script>

<style scoped>
.wraps {
  display: flex;
  flex-wrap: wrap;
  width: 200px;
}
.item-box {
  width: 20px;
  height: 20px;
  text-align: center;
  line-height: 20px;
  border: 1px solid black;
}
.mmm {
  transition: all 1s;
}
</style>
效果:

状态过渡
vue 同样可以给数字 Svg 背景颜色等添加过渡动画
数组递增效果
<template>
  <div>
    <input type="number" step="20" v-model="number.current" />
    <div>
      {{ number.tweenedNumber.toFixed(0) }}
    </div>
  </div>
</template>

<script setup lang="ts">
import { reactive, watch } from 'vue'
import gsap from 'gsap'
const number = reactive({
  current: 0,
  tweenedNumber: 0,
})

watch(
  () => number.current,
  (newVal, oldVal) => {
    gsap.to(number, {
      duration: 1,
      tweenedNumber: newVal,
    })
  }
)
</script>

<style scoped></style>
效果:

4.插槽
4.1 匿名插槽
通过子组件放入一个插槽<slot>
<div>
    <slot></slot>
</div>
父组件中使用
<child>
	<template v-slot>
    	<div>
            插入插槽
        </div>
    </template>
</child>
这是父组件中写的<template slot>标签包裹的内容,会被替换到子组件中<slot>的位置
4.2 具名插槽
当我们子组件中有多个插槽的时候,这时候我们怎样确定我插入的那个位置呢,这时候可以使用具命插槽。
子组件
<div>
    <slot name="header"></slot>
    <slot name="main"></slot>
</div>
父组件
<div>
    <template v-slot="header">
    	<div>
            我是头部
        </div>
    </template>
</div>
这时就会被插入到指定的位置
4.3 作用域插槽
如果需要在父组件中,需要拿到子组件的值
子组件
<template>
  <div>
    <div v-for="item in data">
      <slot name="header" :data="item"></slot>
    </div>
  </div>
</template>

<script setup lang="ts">
import { reactive } from 'vue'

const data = reactive([1, 2, 3, 4])
</script>
父组件
<template>
  <div>
    <SlotChild>
      <template v-slot:header="{ data }">{{ data }}</template>
    </SlotChild>
  </div>
</template>

<script setup lang="ts">
import SlotChild from './SlotChild.vue'
</script>
通过在父组件的<template v-slot:header="{data}">可以将 data 解构出来,这就是作用域插槽。
5.依赖注入
通常我我们需要需要像子组件传递参数的时候可以使用props,如果需要向深层次的子组件传递参数如果仅仅通过 props, 则只能将其沿着组件链逐级传递下去,这会非常麻烦。(prop 逐级透传)
这是侯我们可以使用provide, inject. 可以通过provide 传递指定的值, 通过在任意深度的子组件中通过inject获取到。
父组件
<script setup lang="ts">
import ProvideB from './ProvideB.vue'
import { provide, ref } from 'vue'
const color = ref('')
provide('color', color)
</script>
子组件
<script setup lang="ts">
import ProvideC from './ProvideC.vue'
import { inject, ref } from 'vue'
const color = inject('color')
</script>
这样写修改子组件也会影响父组件.如果想要子组件无法修改父组件,需要到设置provide中的值为readonly
<script setup lang="ts">
import ProvideB from './ProvideB.vue'
import { provide, ref } from 'vue'
const color = ref('')

provide('color', readonly(color))
</script>
6.事件总线
兄弟组件通信, 可以通过父组件做一个传递, 也可也使用事件总线的方式进行传递。
在 vue2 中我们可以通过this.prototype.$bus = new Vue() 的方式来使用全局事件总线,但是在 vue3 中, prototype 属性就被取消了。在 vue3 中推荐使用 mitt 这一三方库,Mitt 来实现。
6.1 Mitt
安装
pnpm install mitt -S
初始化在 main.ts
import './assets/main.css'
import 'animate.css'
import { createApp } from 'vue'
import App from './App.vue'
import mitt from 'mitt'

const Mit = mitt()

const app = createApp(App)

// 提供ts类型支持
declare module 'vue' {
  export interface ComponentCustomProperties {
    $Bus: typeof Mit
  }
}

app.config.globalProperties.$bus = Mit

app.mount('#app')
使用
<template>
  <div>
    <button @click="emit">传送</button>
  </div>
</template>

<script setup lang="ts">
import { getCurrentInstance } from 'vue'
const instance = getCurrentInstance()

const emit = () => {
  instance?.proxy?.$Bus.emit('on-click', '传送')
}
</script>

<style scoped></style>
getCurrentInstance获取当前组件实例
6.2 Bus 的实现
type BusClass = {
    emit: (name: string):void
    on:(name: string, callback:Function):void
}

type PramsKey = string | number | symbol
type List = {
    [key:PramsKey]:Array<Function>
}

class Bus implements BusClass {
    list: list
    constructor() {
        this.list = {}
    }

    emit(name:string, ...args:Array<any>){
        let eventName:Array<Function> = this.list[name]
        eventName.forEach(fn => {
            fn.apply(this, args)
        })
    }

    on(name:string, callback:Function) {
        let fn:Array<Function> = this.list[name] || []
        fn.push(callback)
        this.list[name] = fn
    }
}
7.TSX
我们之前的使用都是通过Template的方式去写我们的模板,现在可以扩展另外一种方式TSX
使用 TSX
- 方式一:直接返回一个渲染函数
Test.tsx
import default function(){
    return (<div>哈哈哈</div>)
}
App.vue 中直接导入组件
<template>
  <Test></Test>
</template>

<script>
import Test from '.rander/test'
</script>
需要先配置否则 vite 会报错
安装指定包
pnpm install vitejs/plugin-vue-jsx
配置 vite.config.js
import { fileURLToPath, URL } from 'node:url'

import { defineConfig } from 'vite'
import vue from '@vitejs/plugin-vue'
import vueJsx from '@vitejs/plugin-vue-jsx'

// https://vitejs.dev/config/
export default defineConfig({
  plugins: [vue(), vueJsx()],
  resolve: {
    alias: {
      '@': fileURLToPath(new URL('./src', import.meta.url)),
    },
  },
  css: {
    preprocessorOptions: {
      scss: {
        additionalData: `@import "./src/bem.scss";`,
      },
    },
  },
})
- 方式二:通过 vue 中的
defineComponent(optionsAPI)
Test.tsx
import { defineComponent } from 'vue'
export default defineComponent({
  data() {
    return {
      age: 23,
    }
  },

  render() {
    // 在template 中是双括号,在jsx语法中是用的单括号
    return <div>{this.age}</div>
  },
})
- 方式三:
defineComponent+setup
import { defineComponent } from 'vue'
export default defineComponent({
  setup() {
    return () => <div>hhahah</div>
  },
})
注意:
- ref 在 jsx 中不会自动解包需要自己
.value
import { defineComponent } from 'vue'
export default defineComponent({
  setup() {
    const data = ref('aa')
    return <div>{data.value}</div>
  },
})
tsx 中使用事件和 props,emit
import {defineComponent} from 'vue'
export default defineComponent({
    props: {
    	name: String,
  	},
  	emits: ['on-click'],
    // 需传入, 传入emit
    setup(props, {emit}){
        const data = ref('aa')
        const fn = () => {
            console.log('haha')
        }
        return (
            <div>{data.value}</div>
            <div>{props.name}</div>
            // 在tsx中绑定事件不在是@ 而是直接on-click
            // 不能打括号,否则会进入就会默认执行了一次, 如果需要传递参数则:
            // <button onClick={() => fn('参数1')}></button>
            <button onClick={fn}></button>
        )
    }
})
tsx 中使用 slot
import {defineComponent} from 'vue'

// 定义插槽
const A = (_, {slots}) => (<>
    	<div>{slots.default ? slots.default() : '默认值'}</div>
    	<div>{slot.foo?.()}</div>
    </>)

export default defineComponent({
   	setup() {

       // 定义插槽内容
       const slots = {
           default: () => (<div>default slot</div>)
           foo: () => (<div>zaj slots</div>)
       }

    	return () => (<>
    		<A v-slots={slots}></A>
    	</>)
    }
})
7.2 实现一个 vite 插件解析 tsx
我们在 vue 编写 tsx 的时候, 是事先导入了一个插件@vitejs/plugin-vue-jsx,如果没有导入该插件, 运行时会报错, 现在我们来自己实现一个 解析 tsx 的插件
1.安装插件
pnpm install @vue/babel-plugin-jsx
pnpm install @babel/core
pnpm install @babel/plugin-transform-typescript
pnpm install @babel/plugin-syntax-import-meta
pnpm install @types/babel__core
2.编写插件代码
import type { Plugin } from 'vite'
import * as babel from '@babel/core'
import jsx from '@vue/babel-plugin-jsx'

export default function (): Plugin {
  return {
    name: 'vite-plugin-vue-tsx',
    config(config) {
      return {
        esbuild: {
          include: /\.ts$/,
        },
      }
    },
    async transform(code, id) {
      if (/.tsx$/.test(id)) {
        //@ts-ignore
        const ts = await import('@babel/plugin-transform-typescript').then((r) => r.default)
        const res = await babel.transformAsync(code, {
          ast: true,
          configFile: false,
          babelrc: false,
          plugins: [jsx, [ts, { isTSX: true, allowExtensions: true }]],
        })
        return res?.code
      }
      return code
    },
  }
}
@vitejs/plugin-vue-jsx这个插件的原理就是使用了@vue/babel-plugin-jsx 和@babel/plugin-transform-typescript这两个插件实现。
7.3 自动导入插件
antfu 大神写的自动导入插件unplugin-auto-import
可以帮我们简化代码的书写
之前我们使用ref, reactive等需要
import { computed, ref } from 'vue'

const count = ref(0)
const doubled = computed(() => count.value * 2)
现在不需要导入可以直接使用
const count = ref(0)
const doubled = computed(() => count.value * 2)
使用
pnpm i unplugin-auto-import
在 vite.config.js 中配置
import AutoImport from 'unplugin-auto-import/vite'

export default defineConfig({
  plugins: [
    AutoImport({
      imports: ['vue'],
      dts: 'src/auto-import.d.ts', // 需要生成到一个地方
    }),
  ],
})
这样就可以在 template 中直写入而不需要事先 import
8.v-model
v-model在 vue3 中其实是一个语法糖 通过 props 和 emits 组合而成, 在 vue3 中:
- 通过 props(默认值为 modelValue) 和 emits 中
update:modelValue事件 - vue2 中
v-bind.sync修饰符和组件 model 选项已移除 - 新增支持多个 v-model
使用
父组件
<template>
  <div>
    <button @click="isShow = !isShow">切换</button>
    <B v-model="isShow"></B>
  </div>
</template>

<script setup lang="ts">
import B from './B.vue'
import { ref } from 'vue'
const isShow = ref<boolean>(true)
</script>

<style scoped></style>
子组件:
<template>
  <div>{{ modelValue }}</div>
  <button @click="update">修改</button>
</template>

<script setup lang="ts">
const props = defineProps<{
  modelValue: boolean
}>()

const emits = defineEmits(['update:modelValue'])
// 子组件修改绑定的值
const update = () => {
  emits('update:modelValue', !props.modelValue)
}
</script>

<style scoped></style>
也可以绑定多个值
<script setup lang="ts">
const props = defineProps<{
  modelValue: boolean,
  lastVal: string
}>()

const emits = defineEmits(['update:modelValue', 'update:lastVal'])
自定义修饰符
vue3 也支持自定义修饰符,只需要在defineProps中添加绑定的属性名 + Modifiers
// 父组件中
<B v-model="isShow" v-model:lastVal.hah="lastVal"></B>

// 子组件的script中
<script setup lang="ts">
const props = defineProps<{
  modelValue: boolean,
  lastVal: string
  lastValModifiers?:{
    hah:boolean
}
}>()
9.自定义指令
处理 vue 内置的指令如v-if,v-show等等这些之外,还可以自定义指令
自定义指令的生命周期函数总共有七个,分别是created, beforeMount, mounted, beforeUpdate,updated, beforeUnmount,unmounted
<template>
  <div v-move:aaa.test="{ background: 'red' }" class="test"></div>
</template>

<script setup lang="ts">
import type { DirectiveBinding } from 'vue'
import { type Directive } from 'vue'

type Dir = {
  background: string
}

const vMove: Directive = {
  created() {
    console.log('元素初始化时候')
  },
  beforeMount() {
    console.log('指令绑定到元素后调用 只调用一次')
  },
  mounted(el: HTMLElement, dir: DirectiveBinding<Dir>) {
    el.style.backgroundColor = dir.value.background
    console.log('元素插入父级dom调用')
  },
  beforeUpdate() {
    console.log('元素更新之前调用')
  },
  updated() {
    console.log('及他自己的所有子节点都更新后调用')
  },
}
</script>
传入的参数主要是:
el代表绑定的元素,dir代表传入的参数如上通过dir.value能看到绑定的值,- 通过
dir.modifiers能拿到你的修饰符如上的.test, - 通过
dir.arg能够拿到参数名如上例子中的aaa
其他参数参考官网:自定义指令
9.1 实用常见(按钮级别鉴权)
<template>
  <div>
    <button v-has-show="'shop:edit'">创建</button>
    <button v-has-show="'shop:create'">编辑</button>
    <button v-has-show="'shop:delete'">删除</button>
  </div>
</template>

<script setup lang="ts">
import { ref, reactive } from 'vue'
import type { Directive } from 'vue'

localStorage.setItem('userId', 'zaj')

// 后台数据
const permission = ['zaj:shop:edit', 'zaj:shop:create', 'zaj:shop:delete']

const userId = localStorage.getItem('userId') as string
// 自定义指令判断当前参数在没有在后端传过来的权限列表,如果没用就将按钮隐藏
const vHasShow: Directive<HTMLElement, string> = (el, bingding) => {
  if (!permission.includes(userId + ':' + bingding.value)) {
    el.style.display = 'none'
  }
}
</script>

<style scoped></style>
9.2 图片懒加载
<template>
  <div>
    <div class="content-box">
      <img v-lazy="item" v-for="item in arr" alt="" srcset="" />
    </div>
  </div>
</template>

<script setup lang="ts">
import type { Directive } from 'vue'

// glob 是懒加载模式, 类似通过 () => import ('xxxx')
// globEager 静态加载  类似直接 import xxx from 'xxx' 已弃用(可以通过glob后面带参数 eager:true)
// Record 是TypeScript的工具类,可以构建一个对象类型, 以下案例中属性键为 string, 属性的类型为 {defalut: string}
let imageList: Record<string, { default: string }> = import.meta.glob('E://壁纸/*.*', { eager: true })
let arr = Object.values(imageList).map((item) => {
  return item.default
})

const vLazy: Directive<HTMLImageElement, string> = async (el, bingding) => {
  const def = await import('../assets/logo.svg')
  el.src = def.default
  const observer = new IntersectionObserver((enr) => {
    if (enr[0].intersectionRatio > 0) {
      setTimeout(() => {
        el.src = bingding.value
      }, 1000)

      console.log(enr[0])
      observer.unobserve(el)
    }
  })
  observer.observe(el)
}
</script>

<style scoped>
.content-box {
  width: 1000px;
  border: 1px solid black;
}
.content-box img {
  width: 100%;
}
</style>
10.Hooks
Hook 主要用于处理代码逻辑的一些封装, 类似于 vue2 中的 mixin 混入,不同的是 mixin 是个对象, 而 Hook 是个函数,vue 中也有自带的 hookuseAttrs,useSlots
useAttrs(): 会获取到组件上所有的属性useSlots(): 回获取组件中的插槽
10.1 实现一个 hook
自定义一个转图片为 base64 的 hook
import { onMounted } from 'vue'

type options = {
  el: string
}

export default function (options: options) {
  return new Promise((resolve) => {
    onMounted(() => {
      let img: HTMLImageElement = document.querySelector(options.el) as HTMLImageElement
      console.log(img, '=======>')

      // 在图片加载完后执行
      img.onload = () => {
        resolve(base64(img))
      }
    })

    // 通过canvas 将图片转为base64
    const base64 = (el: HTMLImageElement) => {
      const canvas = document.createElement('canvas')
      const ctx = canvas.getContext('2d')
      canvas.width = el.width
      canvas.height = el.height

      ctx?.drawImage(el, 0, 0, canvas.width, canvas.height)
      // cnavas的api 将图片转换为base64
      return canvas.toDataURL('image/')
    }
  })
}
使用
<template>
  <div>
    <img id="img" src="../assets/logo.svg" alt="" srcset="" />
  </div>
</template>

<script setup lang="ts">
import useBase64 from '@/hooks/index'

useBase64({
  el: '#img',
}).then((res) => {
  // data:image/png;base64,iVBORw0KGgoAAAANSU.....
  console.log(res)
})
</script>

<style scoped>
img {
  width: 100px;
  height: 100px;
}
</style>
10.2 综合案例
实现一个函数同时支持 hook 和自定义指令,去监听 dom 宽高,然后发布到 npm 上
编写文件
1.先创建一个文件夹,然后再文件夹中创建, src/index.ts
const userResize(el:HTMLElement, callback:Function) => {
    let resize = new ResieObserver((entries) => {
        callback(entries[0].contentRect)
    })
    resize.observe(el)
}

const install = (app: App) => {
    app.directive('resize', {
        mounted(el: HTMLElement, binding) {
            userResize(el, binding.value)
        }
    })
}
userResize.install = install
export defalut userResize
2.编写 typeScript 类型支持 index.d.ts文件
dedeclare const userResize: {
  (el: HTMLElement, callback: Function): void
  install: (app: App) => void
}
export default userResize
3.初始化 npm 和 ts
pnpm init
tsc --init
4.配置打包选项 vite.config.js
import {defineConfig} from 'vite'
export default defineConfig({
    build: {
        // 打包路径,和名称
        lib: {
            entry: 'src/index.ts',
            name: 'MyLib'
        },
        rollupoPtions: {
        external: ['vue'],
    	output: {
  			globals: {
    			MyLib: 'MyLib'
			}
		}
    }
  }
})
4.在 package.json 配置好打包命令"build":vite build, 然后 npm 运行
5.配置好 package.json
{
  "name": "v-resize-lh",
  "version": "1.0.0",
  "description": "",
  // main 当使用require时用的这个
  "main": "dist/v-resize-xm.umd.js",
  // 当使用import 时用的这个
  "module": "dist/v-resize-lh.mjs",
  "scripts": {
    "test": "echo \"Error: no test specified\" && exit 1",
    "build": "vite build"
  },
  "keywords": [],
  // 配置好要发布上去的文件
  "files": ["dist", "index.d.ts"],
  "author": "",
  "license": "ISC",
  "devDependencies": {
    "vite": "^4.4.6",
    "vue": "^3.3.4"
  }
}
发布 npm
6.发布 npm 需要 npm 账户, 没有需要创建, 注意:需要切换回官方的镜像仓库npm config set registry https://registry.npmjs.org/
npm adduser
7.登录,然后运行
npm publish
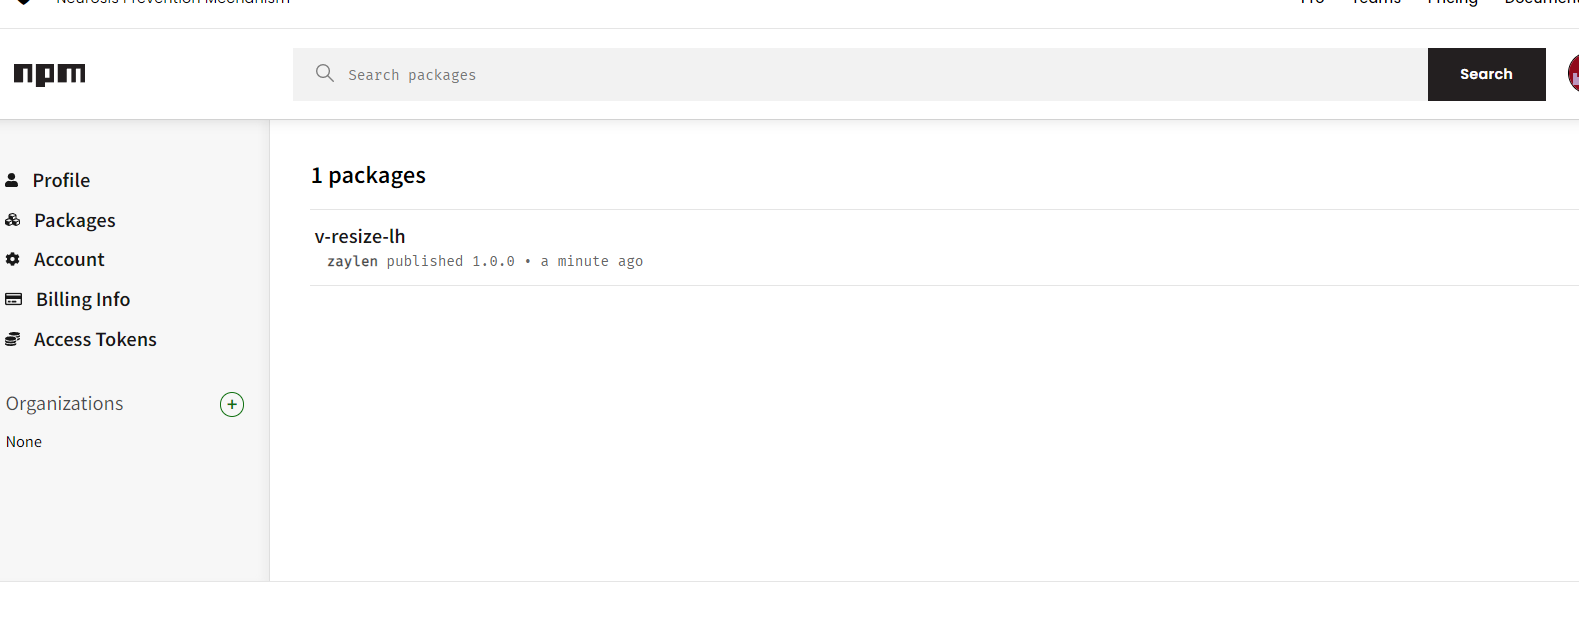
在 npm 官网上即可看到自己的包
使用:

在 app.vue 中
<template>
  <div class="test"></div>
</template>

<script>
import userResize from 'v-resize-lh'
onMounted(() => {
  userResize(document.querySelector('.test') as HTMLElement, function () {
    console.log('hahah')
  })
})
</script>

<style>
.test {
  width: 200px;
  height: 200px;
  border: 1px solid black;
  resize: both;
  overflow: hidden;
}
</style>
这时拖动框框,就能调用回调函数
11.全局变量
由于 vue3 没有 Prototype 属性,使用app.config.globalProperties代替然后去定义变量和函数
在 main.ts 文件里面
app.config.globalProperties.$env = 'env'
在页面中可以直接使用
<div>{{$env}}</div>
在<scirpt> 中需要使用getCurrentInstance 获取当前实例
<script>
import { getCurrentInstance } from 'vue'
const app = getCurrentInstance()
console.log(app?.proxy.$env)
</script>
在 ts 中需要添加类型注释
declare module 'vue' {
  export interface ComponentCustomProperties {
    $env: string
  }
}
12.自定义插件
自定义插件的核心就是要实现install方法,在 vue3 中app.use会调用插件中的 install 方法,来实现加载插件
自己编写一个 loading 插件.
新建一个 Loading 文件夹,在之中新增两个文件index.ts, index.vue
index.vue
<template>
  <div>Loading.....</div>
</template>

<script>
const is Show = ref<boolean>(false)
   const show = () => {
       isShow.value = true
   }
   const hide = () => {
       isShow.value = false
   }

   defineExpose({
       show,
       hide
   })
</script>

<style>
.loading-content {
  width: 100%;
  height: 100%;
  background-color: antiquewhite;
  display: flex;
  justify-content: center;
  align-items: center;
}
</style>
index.ts
import {createVNode, type App, type VNode} from 'vue'
import Loading from './index.vue
import {render} from 'vue
export default {
    install(app: App){
        const vnode:VNode = createVNode(Loading)
        render(vnode, document.body)

        app.config.globalProperties.$loading = {
            show: vnode.component?.exposed?.show,
            hide: vnode.component?.exposed?.hide
        }
    }
}
然后再 main.ts 中注册
main.ts
import Loading from './components/Loading'

const app = createApp(App)

app.use(Loading)

// 在ts中需要定义类型,不然会爆红
declare module 'vue' {
  export interface ComponentCustomProperties {
    $loading: {
      show: () => void
      hide: () => void
    }
  }
}
页面中使用
<script>
import { getCurrentInstance } from 'vue'
const instance = getCurrentInstance()
const show = () => {
  instance?.proxy?.$loading.show()
}
</script>
12.1 自己实现一个简单 use
import {app}  from './main'
interface Use {
    install:(app:App, ...options:any[]) => void
}

const install  = new Set()


export function MyUse<T extend Use>(plugin: T) {
    if(installList.has(plugin)){
        console.error('注册过')
    }else{
        install.add(plugin)
        plugin.install(app, ...options)
    }

}
13.Scoped 和样式穿透
scoped 的原理就是给每个 css 样式添加唯一不重复的标记:data-v-hash, 在每句 css 选择器的末尾加一个当前组件的 data 属性选择器,组件内部如果包含其他组件,只会给其他组件的最外层添加上当前组件的标签
使用方式:添加:deep()函数
<template>
  <div class="at"></div>
</template>
<style>
:deep(.at) {
}
</style>
13.1 插槽选择器:slotted()
当我们使用插槽时,当前组件的slot会在父组件中被替换,如果我们想要当前组件中书写的样式能够作用到,插槽中的内容,这时候就需要使用插槽选择器.
使用:
child.vue
<template>
  <div>
    我是插槽
    <slot></slot>
  </div>
</template>

<style scoped>
:slotted(.a) {
  color: red;
}
</style>
index.vue
<template>
  <div>
    <child>
      <div class="a">我是插入的内容</div>
    </child>
  </div>
</template>
13.2 全局选择器:global()
在 vue3 项目中的 template 模板中,在 style 标签上不加scoped就默认是全局样式,我们业可以通过:global()标签来设置全局样式
使用:
/*这时a选择器就是全局的*/
:global(.a) {
  color: red;
}
13.3 动态 css
该种方式可以让你能通过 js 的方式控制 css
使用
<template>
  <div class="div"></div>
</template>

<script>
const style = ref({ color: 'red' })
</script>

<style>
.div {
  color: v-bind('style.color');
}
</style>
还可以使用module形式.
<template>
  <div :class="[$style.div, $style.border]">动态css</div>
</template>
<script></script>

<style module>
.div {
  color: red;
}
.border {
  border: 1px solid #ccc;
}
</style>
我们也可以给 moudle 命名
<style module="hahah"></style>
使用
<div :class="[hahah.div, hahah.border]"></div>
vue3 也提供了一个 hook 来获取 css
import { useCscModule } from 'vue'
const css = userCssModule('hahah')
